Summary | Key concept | Science Story | Background Science | Activity | Curriculum links | Linked Activities
- Suggested Age Range: 9 – 10 years
- UK Primary Curriculum: Key Stage Two (upper)
- Suggested UK Year Group: Year 5
- UK Primary Curriculum Link: Earth and Space
- Science Subject: Seasonal changes
- Science Question: Why do we have seasons?
- Activity type: pairs or small groups
- Suggested linked stories: Shingbiss and the Winter Wind; Which is stronger, Summer Sun or Winter Wind?; Spring Defeats Winter; How Fisher went to Skyland;
Brief summary: The seasons are easily observed over a school year, and the different plants and insects that are active at particular times are easy to spot. The seasons are caused by changing amounts of sunlight that reach the ground, determined by the height of the Sun in the sky and the length of the shadows, which in turn is determined by the tilt of the Earth’s axis.
Key concept: The seasons occur because the tilt of the Earth changes the amount of sunlight we receive.
Key words: season, axis, tilt, hemisphere, equator, orbit, spin, North Star, angle
The Science Story: Optional: use a standard Earth globe on a stand to illustrate the tilt of the Earth.
Who knows the names of the different seasons?
Spring, summer, autumn, winter. The seasons are all different, there are different plants, different animals, different weather, they all have their own special character.
What do we see in spring?
Leaves grow on the trees, daffodils grow in the garden, birds build nests, etc.
What is the weather like in summer?
It’s warm, warmer than spring. The trees still have their leaves, lots of plants flower, there are lots of insects, bees, butterflies, etc.
What happens in autumn?
It gets a bit colder, leaves turn brown and start to fall from the trees, insects start to disappear, some animals go into hibernation and birds start to migrate to somewhere warmer.
And what is the weather like in the winter?
It is very cold, sometimes it snows, there are no leaves on the trees, no flowers.
Imagine you are standing in the playground at lunchtime in summer.
How high is the Sun in the sky?
In summer, the Sun is high in the sky at lunchtime.
What about in the winter, how high is the Sun then?
In winter, the Sun is much lower in the sky at lunchtime.
Have you noticed what happens to your shadow as the seasons change?
In summer when the Sun is high in the sky your shadow is short. In winter, when the Sun is lower in the sky, your shadow gets longer and longer.
In the UK it is summer during June, July, August. (Hold up Earth model and point to the UK.)
Is it also summer in Australia?
No, in June, July and August it is winter in Australia. Different places on the Earth have the different seasons at different times of the year. When we have warm weather and ice cream in the UK, Australia has rain and frosty mornings. When we have snow and ice, Australia has sunshine and warm weather – they spend Christmas on the beach!
The Science: The Earth has an axis, an imaginary line which runs through the Earth between the North and South Poles. The Earth spins on this axis, just like an Earth globe does. As it spins on its axis, it is also moving in a circular orbit around the Sun. Like a spinning top in motion, the axis of the Earth’s spin does not change as it moves in its orbit. Imagine the axis of the Earth as a long stick passing all the way through the Earth, going in at the South Pole and coming out at the North Pole. The north end of this stick always points towards the North Star (also known as Polaris). This means that for part of the year the Northern Hemisphere of the Earth is tilted towards the Sun, and for part of the year the Southern Hemisphere is tilted towards the Sun.
The difference in heat received from the Sun is caused by the angle that the sunlight has when it hits the ground. This is easier to think about and visualise in terms of shadows. If you stand in the Sun in summer at midday, the Sun is high in the sky, your shadow is very small, and you feel very warm. A lot of sunlight is concentrated in a small area, and the ground heats up quickly. If you stand in the Sun later in the evening when it is about to set, the Sun is now low in the sky, your shadow is very long, and you feel less heat from the Sun. Now, the same amount of light from the Sun is spread over a much larger area on the ground, so fewer sunbeams hit you, and you feel cooler. In Winter the Sun never gets very high above the horizon, so you never get very warm.
Imagine the Earth at midsummer in the Northern Hemisphere, June 21st. On this date the North Pole is tilted towards the Sun, shadows in the Northern Hemisphere are short at midday and a lot of light from the Sun hits each square metre of the ground, making the weather warmer. We also have longer hours of daylight then nighttime. At the same time (21stJune) in the Southern Hemisphere, the South Pole is tilted away from the Sun, it is winter, shadows are much longer at midday, much less sunlight hits each square metre of the ground, and the temperature is much colder as a consequence.
The activity: This activity is in three steps. First the students use a torch to see how the same amount of light can be concentrated or spread out, depending on the angle. Then they assemble a model of the Earth using an orange, and then experiment with it to show the tilt of the Earth and how seasons are different around the World. Some useful videos illustrating why we have the seasons are included below under “linked resources”. These could be shown in class either before or after the activity.
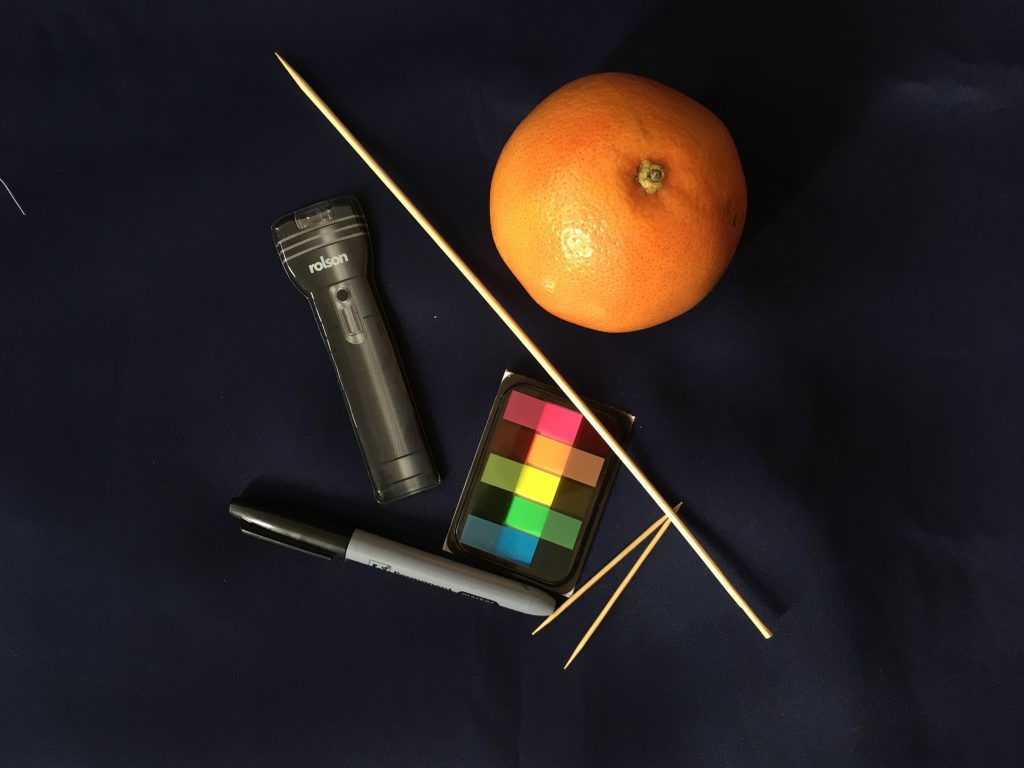
Props required (per pair/group):
- Torch
- White sheet of paper
- Orange, apple, or other round fruit[1]
- Marker pen
- Cocktail sticks or similar (two per group)
- Wooden or bamboo skewers (one per group)
- Stickers to write on
- Sheet of A4 paper with a simple star drawn on it (only one required)
Safety note: care should be taken with the sharp cocktail sticks and skewers, some children may need extra help or supervision
Safety note: in this activity, the torch is used as the Sun. It is important that students understand that they should NEVER look directly at the Sunas this can lead to permanent eye damage.
[1]Polystyrene balls also work well for this activity. They can be sourced from craft shops or in large quantities from online retailers.
Experiment one:
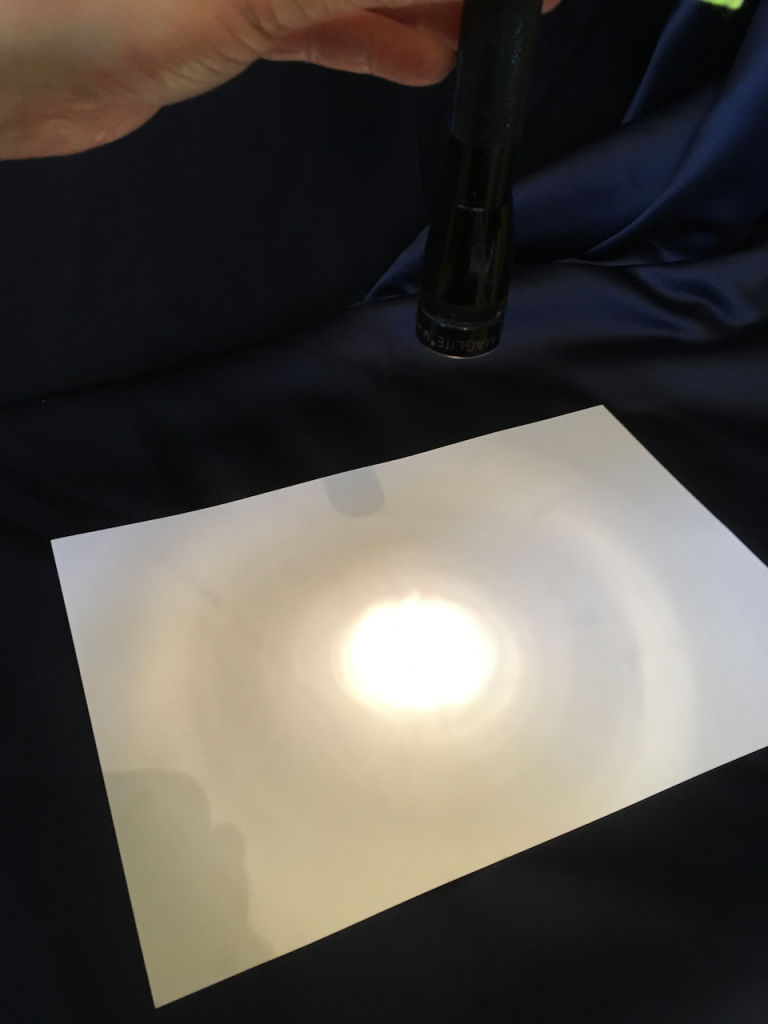
- Put a piece of white paper flat on the table in front of you.
- Hold the torch in the air, about 30-40cm above the paper. Point the torch towards the paper and turn on the beam.
- What shape does the light make on the paper?
- Use the marker pen, carefully draw around the light on the paper.
- Now experiment with your torch by slowly moving it in an arc towards the table. Does the light change shape on the paper?
- With the torch pointing at the paper at a small angle, carefully draw around the light again.
- Are the two shapes the same, or are they different? Do they have the same size?
Steps 1,2&3: shine a torch directly at a sheet of paper and look at the shape made by the light 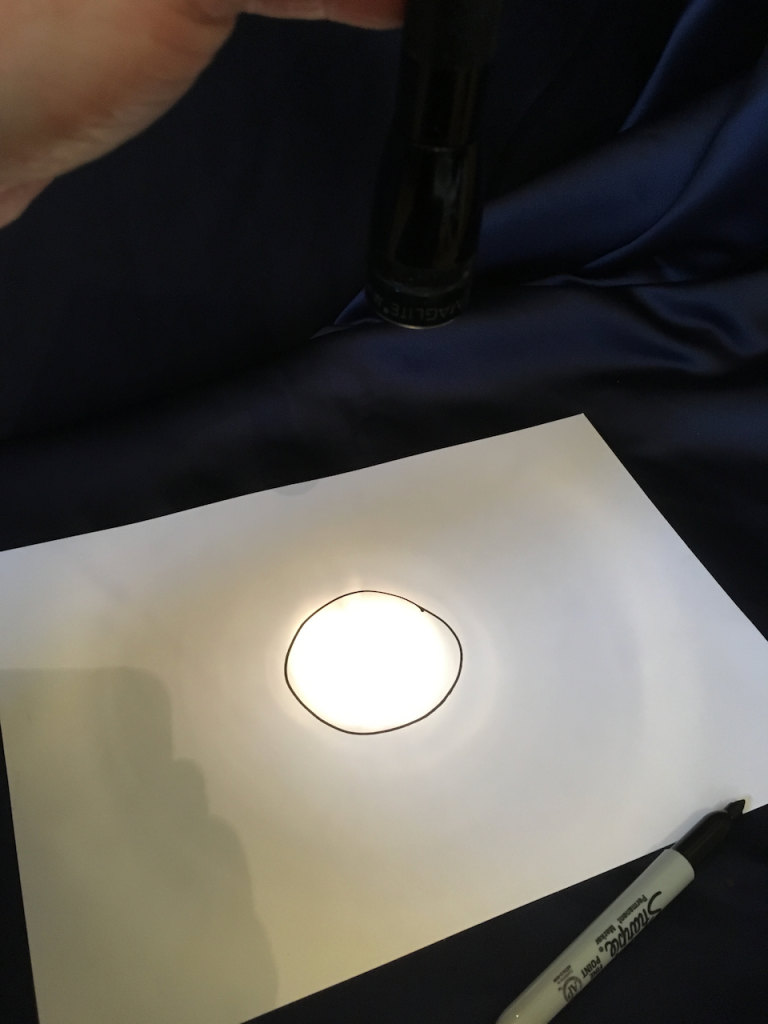
Step 4: draw around the shape made by the light on the paper 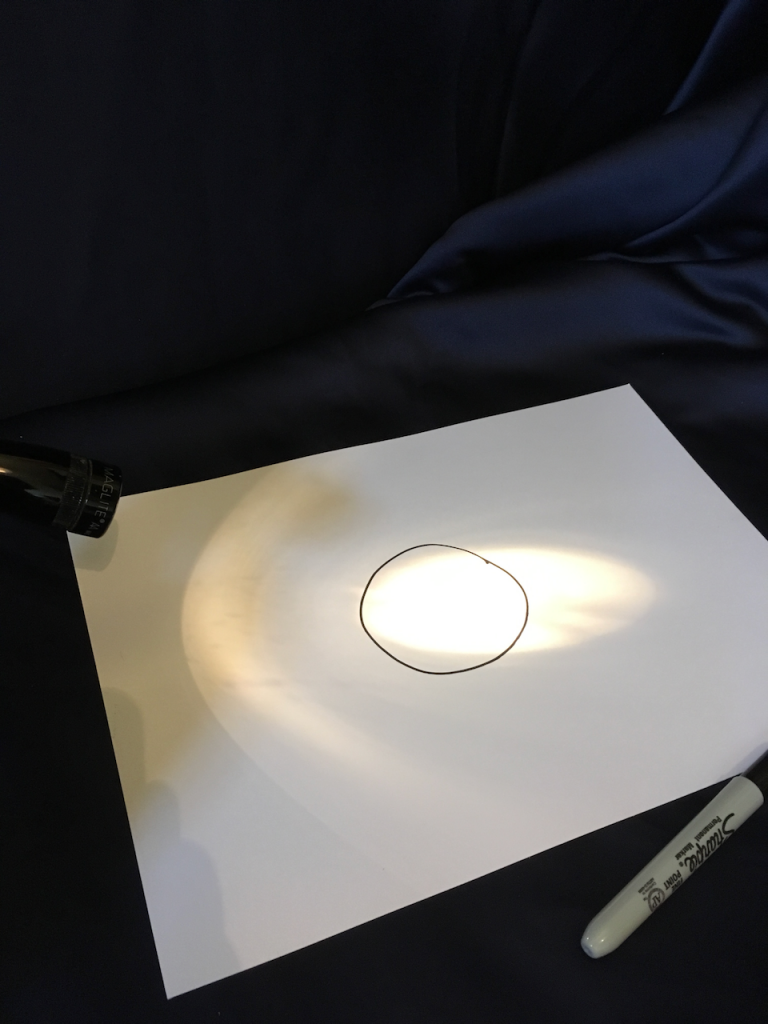
Step 5: move the torch and look at the new shape made by the light 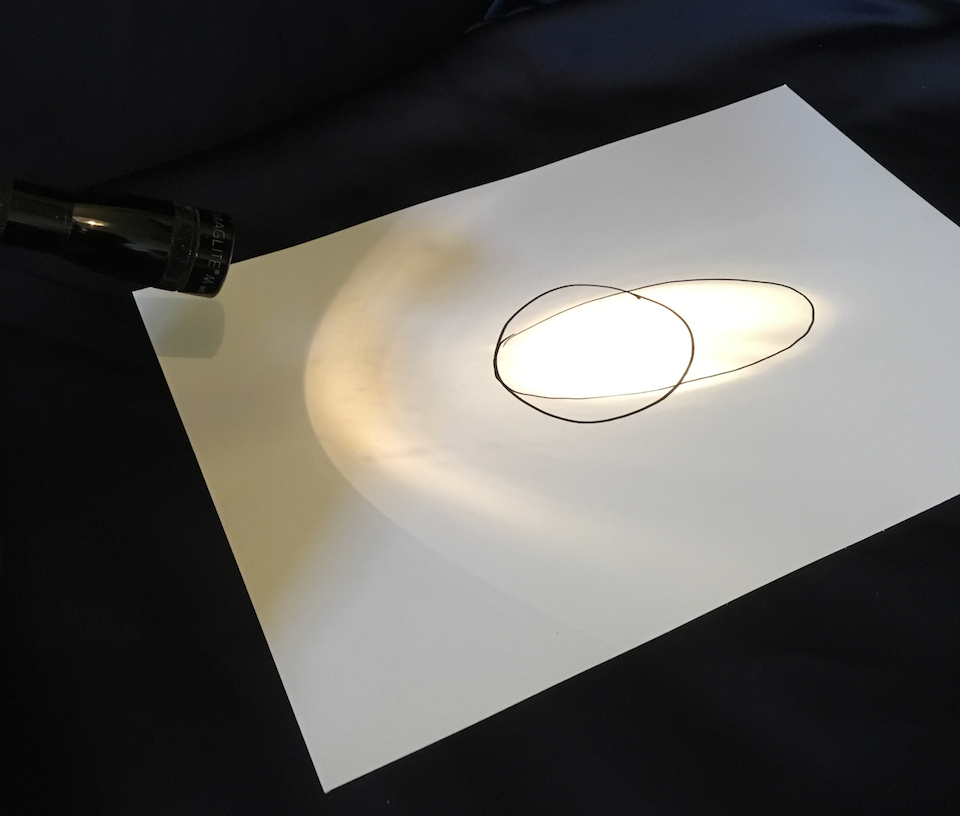
Steps 6&7: carefully draw around the new shape made by the light and compare the two shapes
The key here is that the same amount of light can be concentrated in a small area or can be spread out over a large area. It all depends on the angle between the torch and the paper (or the Sun and the surface of the Earth). When concentrated in a small area, the light will appear brighter to our eyes. The same effect is true of heat. Our heat comes from the sun in the same way that light does. Heat concentrated on a small area feels hot, but the same amount of heat spread over a larger area will not feel as warm.
Experiment two:
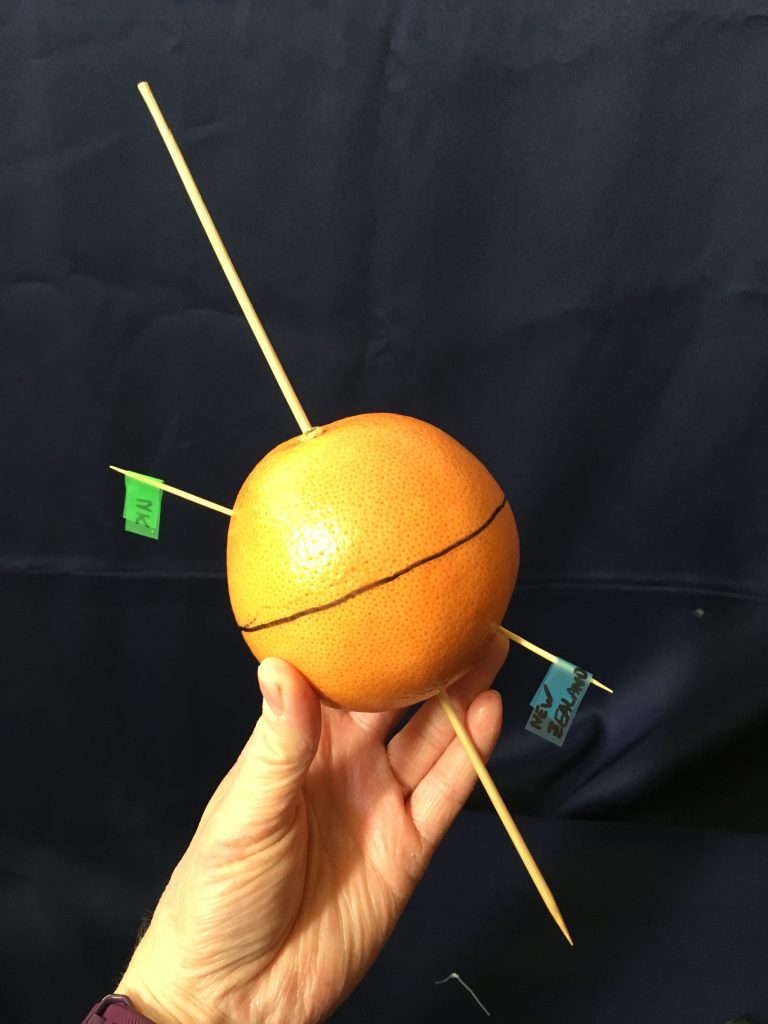
- Now take your orange (or similar). Carefully push the skewer all the way through the orange so that it sticks out at both ends.
- One end of the skewer is the North Pole, the other is the South Pole. Use the marker pen to write “N” at the North Pole, and “S” at the South Pole.
- Use the marker pen to draw a circle all the way around the middle of the orange, halfway between the North Pole and the South Pole. This circle is the Equator.
- Hold the orange so that the North Pole is at the top of the orange. The Earth spins around the imaginary line between the North and South Poles. Hold the skewer and spin the Earth – this is how the Earth moves.
- Carefully push a cocktail stick into the orange halfway between the North Pole and the Equator.
- Write “UK” on one of your labels. Attach this label to the cocktail stick in your orange.
- Push another cocktail stick into the orange, directly opposite the UK marker.
- Write “New Zealand” on a sticker and attach it to your cocktail stick.
- You have now constructed a simple model of the Earth. We can experiment with this model to see how seasons work.

Step 1: push the skewer through the orange to make the Earth’s axis 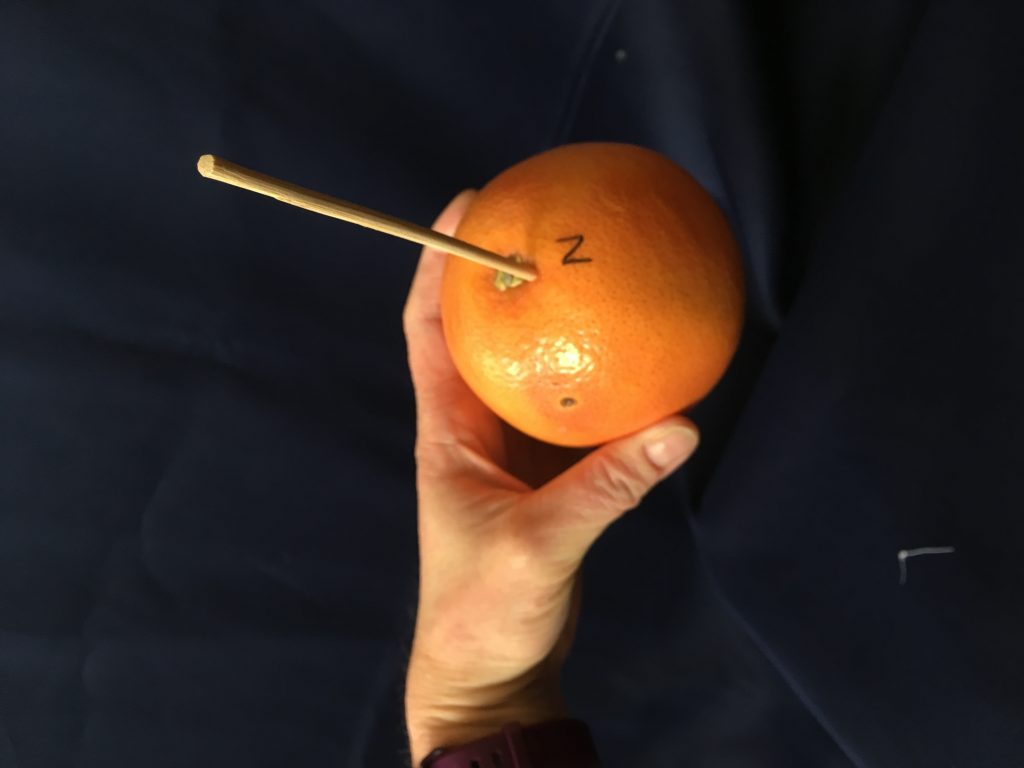
Step 2: label the North (and South) Pole 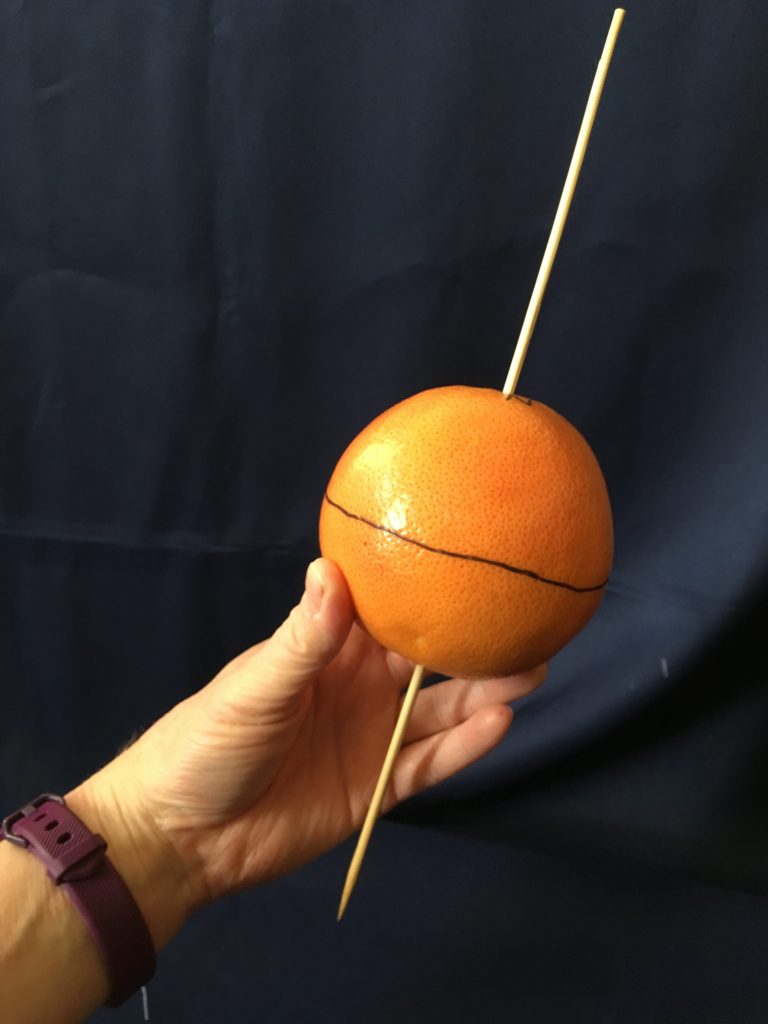
Step 3: draw the Earth’s equator 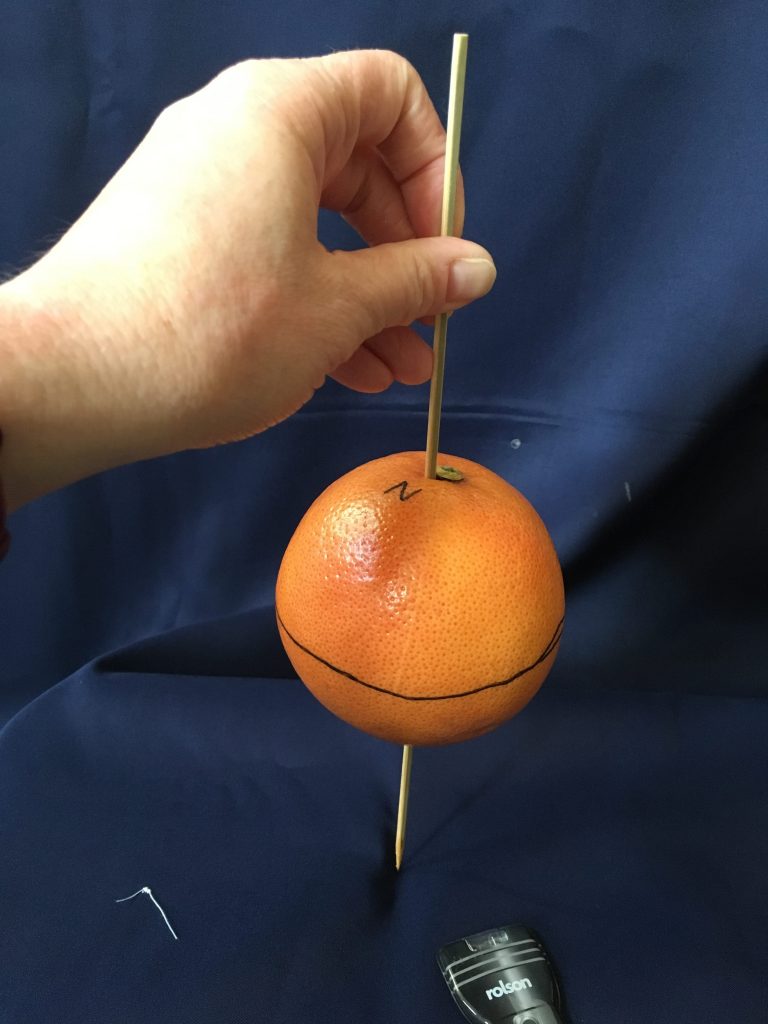
Step 4: hold the orange so that the North Pole is at the top and spin the Earth on its axis 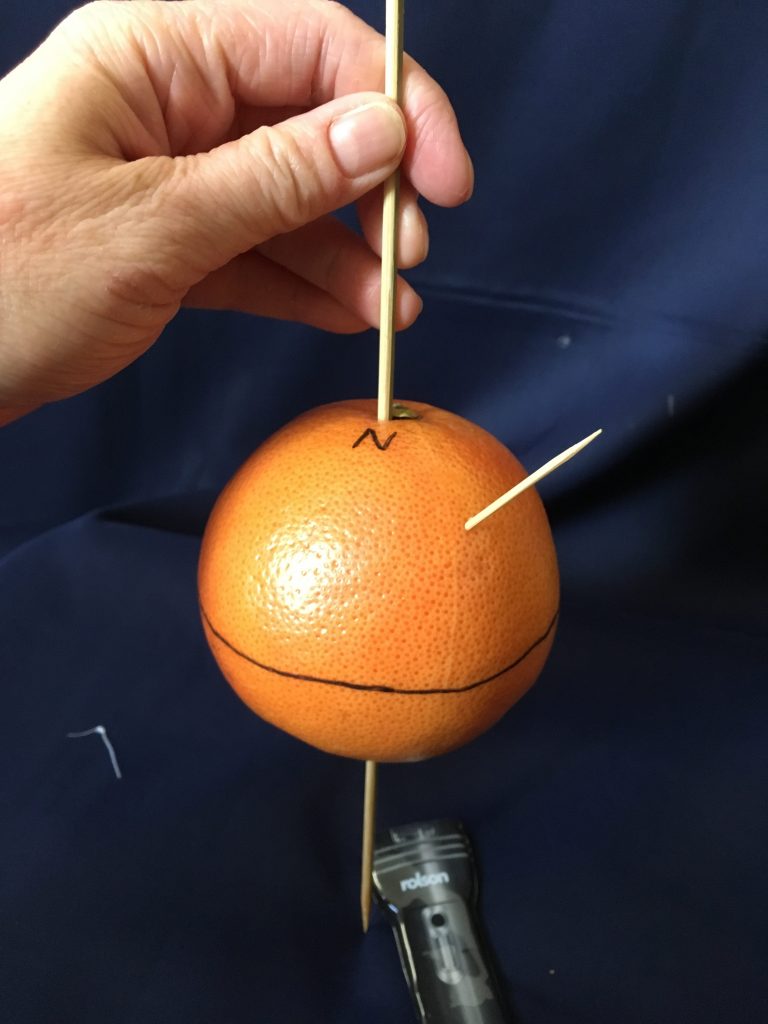
Step 5: push a cocktail stick into the orange, halfway between the North Pole and the equator 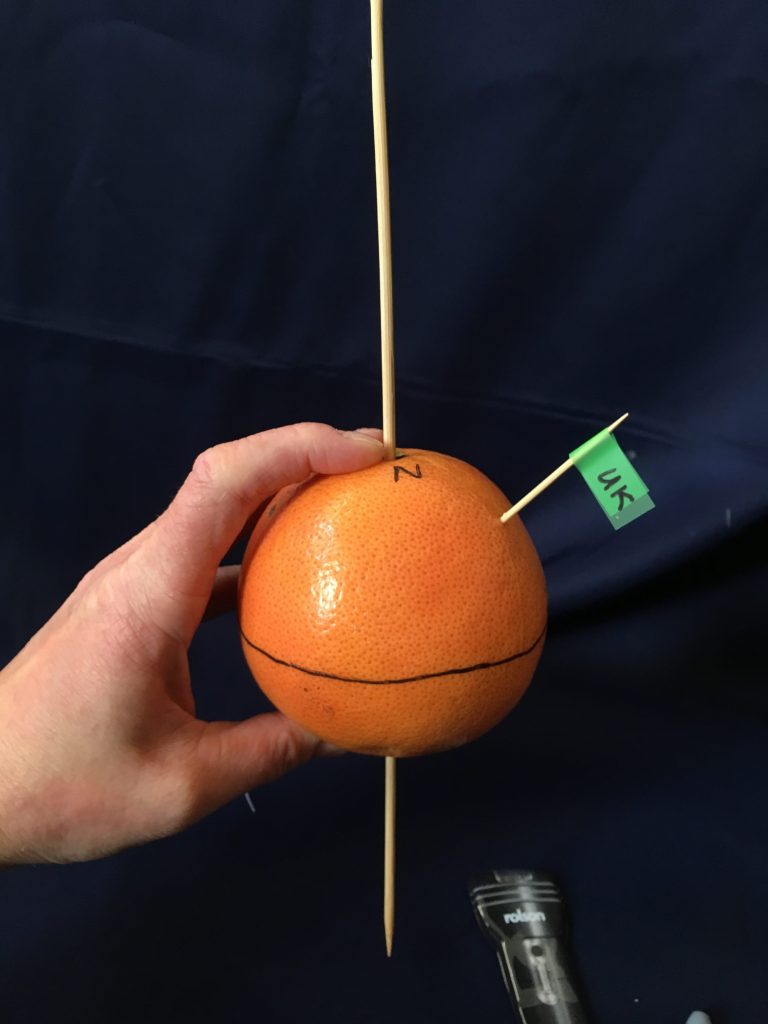
Step 6: label the cocktail stick “UK” 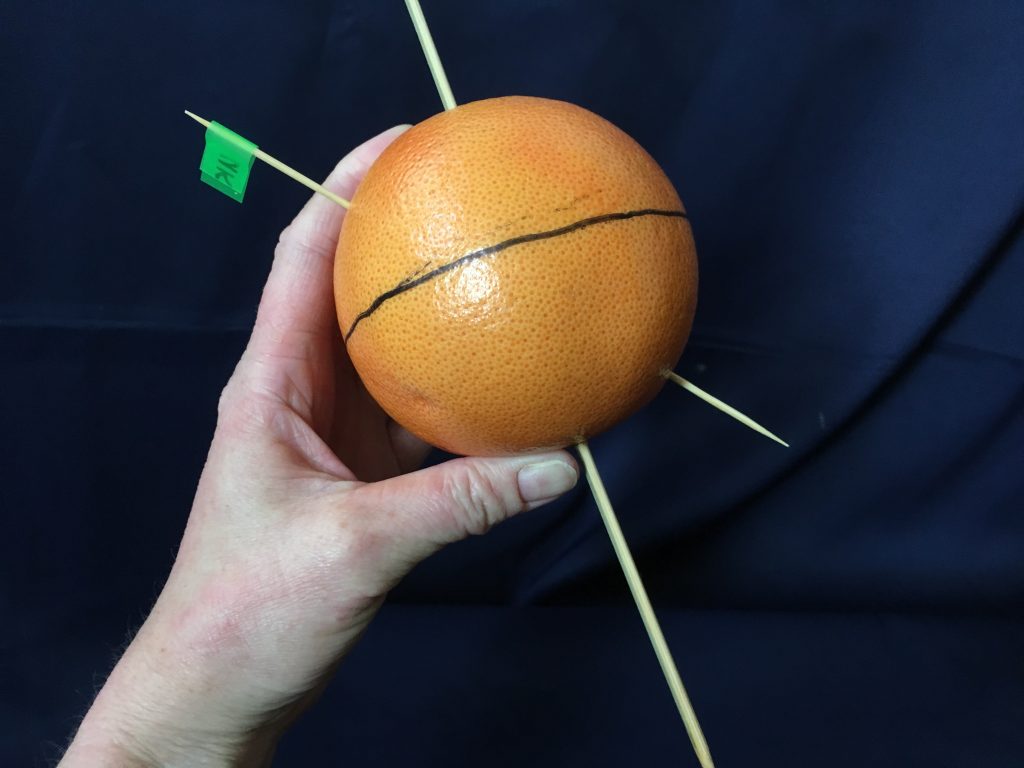
Step 7: push another cocktail stick into the orange, directly opposite the UK marker 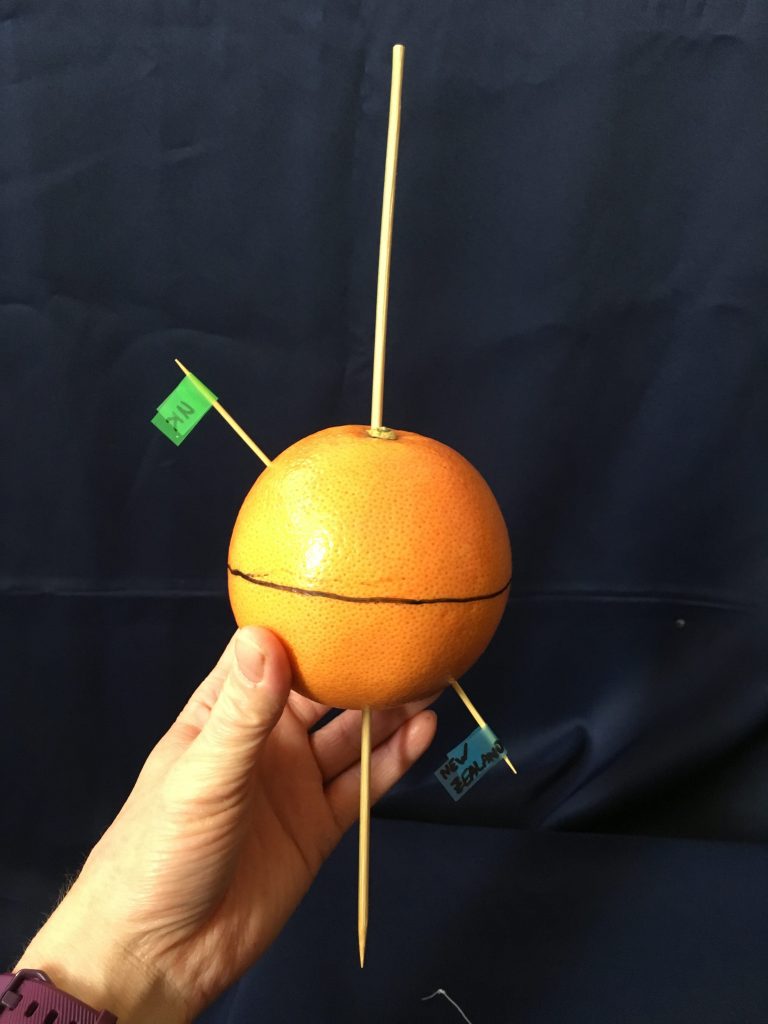
Step 8: label the cocktail stick “New Zealand”
The Earth model has enough detail to illustrate the spin of the Earth around its axis, the reason we have day and night. If you have more time for this activity and are using polystyrene balls instead of fruit, the students can also draw or colour in the balls to show the major land masses and the oceans.
Experiment three:
Before starting this experiment, stick the picture of a star on one wall of the classroom or school hall. This will represent the North star (also known as Polaris) in the following experiment.
- The Earth spins on its axis (the imaginary line connecting the North and South Poles) every 24 hours – this gives us day and night. This axis is tilted slightly, so tilt your orange slightly so that the North Pole points towards the picture of the North Star.
- Turn on your torch. This is the Sun in our model. Make sure the torch is between the Earth and the North Star. Point the torch towards the Earth.
- In summer in the Northern Hemisphere, the Sun is high in the sky. Keeping the North Pole pointed towards the North Star, turn your orange on its axis so that the torch is pointing directly at the cocktail stick marked UK.
- Carefully look at the shape the light beam makes on the orange near the UK. Is it circular? Is it oval? How long is the shadow created by the cocktail stick?
- Hold the torch still and spin the Earth on its axis so that the marker labelled New Zealand is on the side facing the Sun. It is still summer in the Northern Hemisphere, so it is winter in the Southern Hemisphere. The Earth takes 24 hours to spin once on its axis, so now it is night in the UK and day in New Zealand.
- Carefully look at the shape the light beam makes on the orange near New Zealand. Is it circular? Is it oval? How long is the shadow created by the cocktail stick? How high would the Sun look in the sky?
- The Earth also moves around the Sun in a circle. Scientists call this circle an “orbit”. The Earth orbits the Sun once every 365 (and a quarter) days. To see how this works, one person holds the torch (Sun) and keeps it pointing directly at the orange (Earth). The person holding the orange should move it in a circle around the torch.
- As the orange moves around the torch in its orbit, be careful to keep the North Pole pointing towards the North Star.
- Stop moving the Earth when you reach the opposite side of the Sun. Six months have now passed, and it is now winter in the Northern Hemisphere and summer in the Southern Hemisphere. Make sure the North Pole is still pointing towards the North Star.
- Spin the Earth on its axis so that the Sun points to New Zealand again. Carefully look at the shape the light beam makes on the orange near New Zealand now. Is it circular? Is it oval? How long is the shadow created by the cocktail stick? How high would the Sun look in the sky?
- Rotate the Earth so that the Sun points to the UK. Make sure the North Pole is still pointing towards the North Star!
- Carefully look at the shape the light beam makes on the orange near the UK. Is it circular? Is it oval? How long is the shadow created by the cocktail stick?
Step 1: tilt the Earth so that the North Pole points towards the North Star 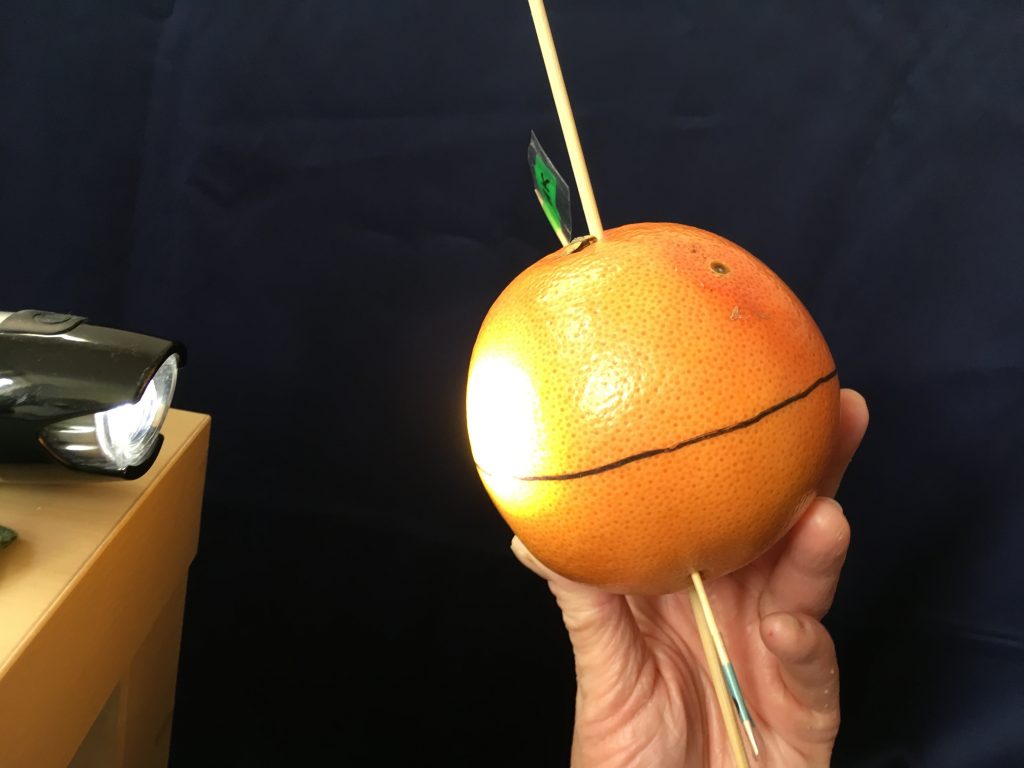
Step 2: turn on your torch and point it towards the Earth 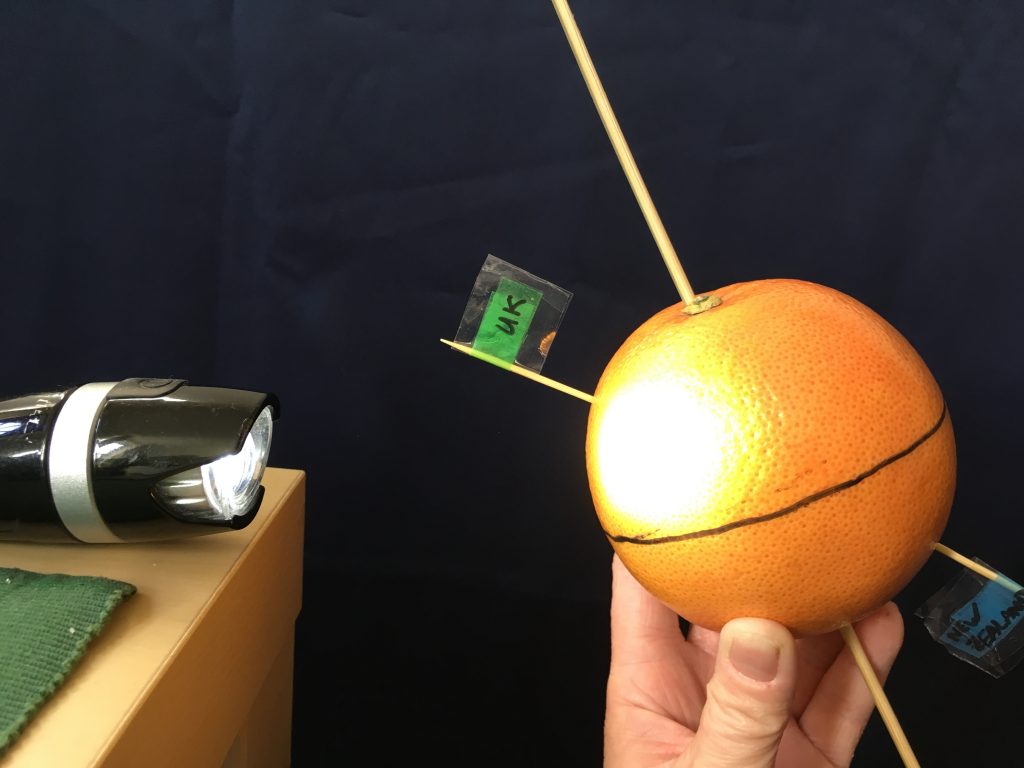
Step 3: spin your Earth so that the UK is towards the Sun – this is summer in the Northern Hemisphere 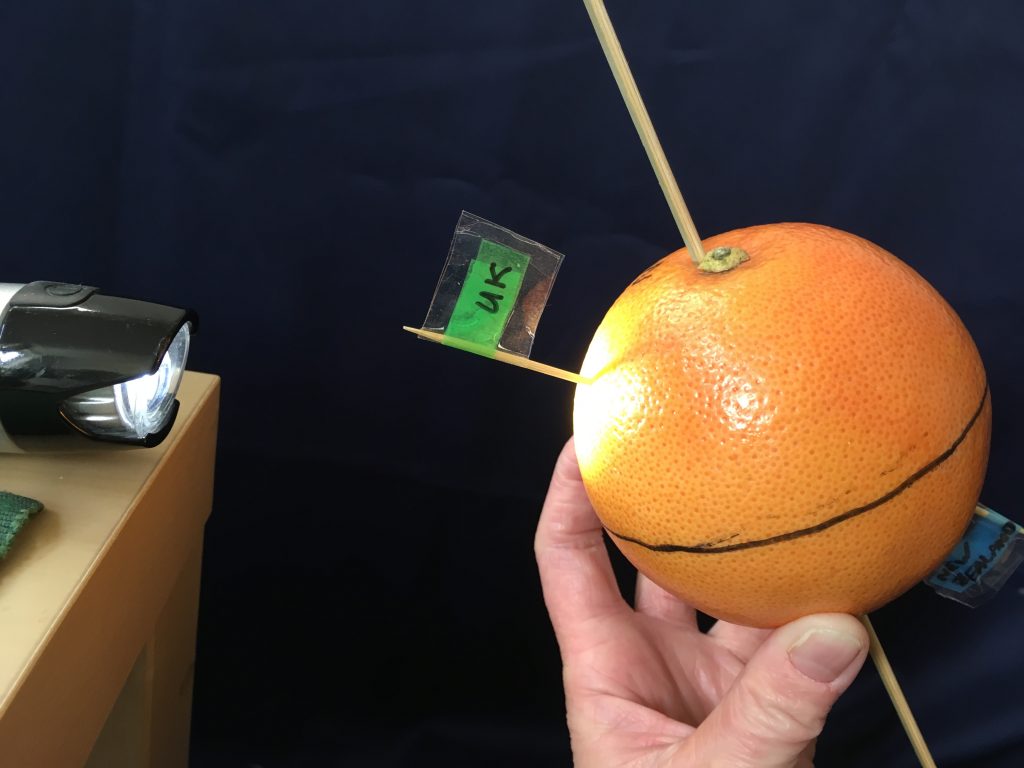
Step 4: look carefully at the shape the light makes on the Earth, and the length of the shadow of the cocktails stick 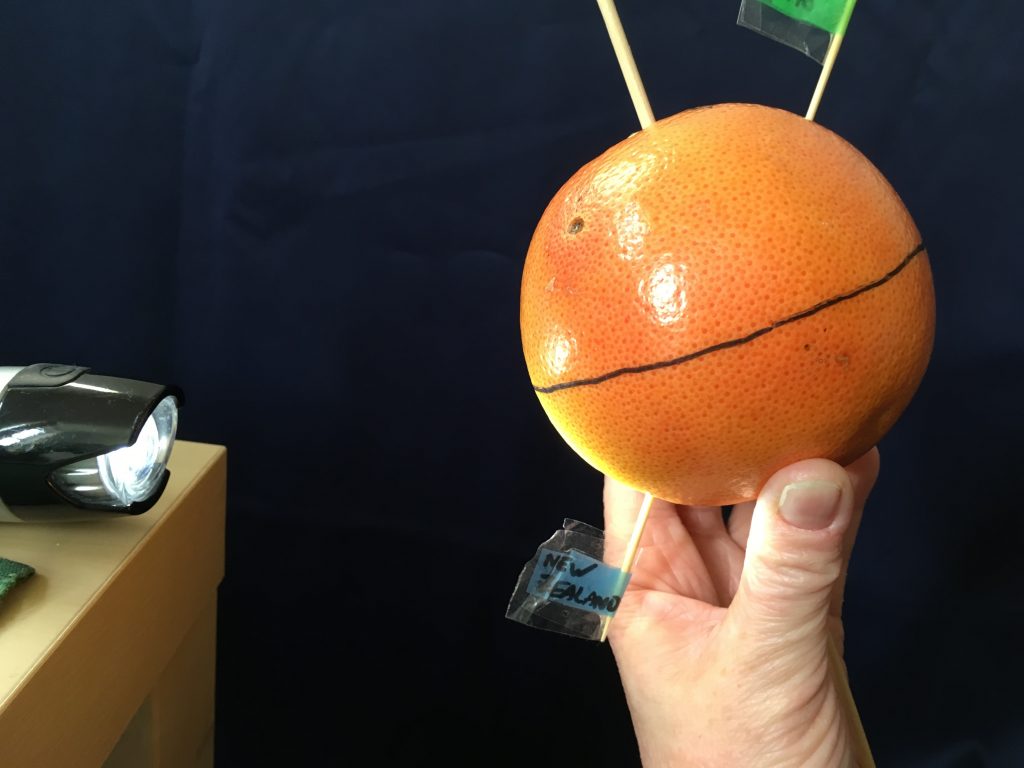
Step 5: spin the Earth so that New Zealand is towards the Sun 
Step 6: look carefully at the shape the light makes on the Earth, and the length of the shadow of the cocktails stick 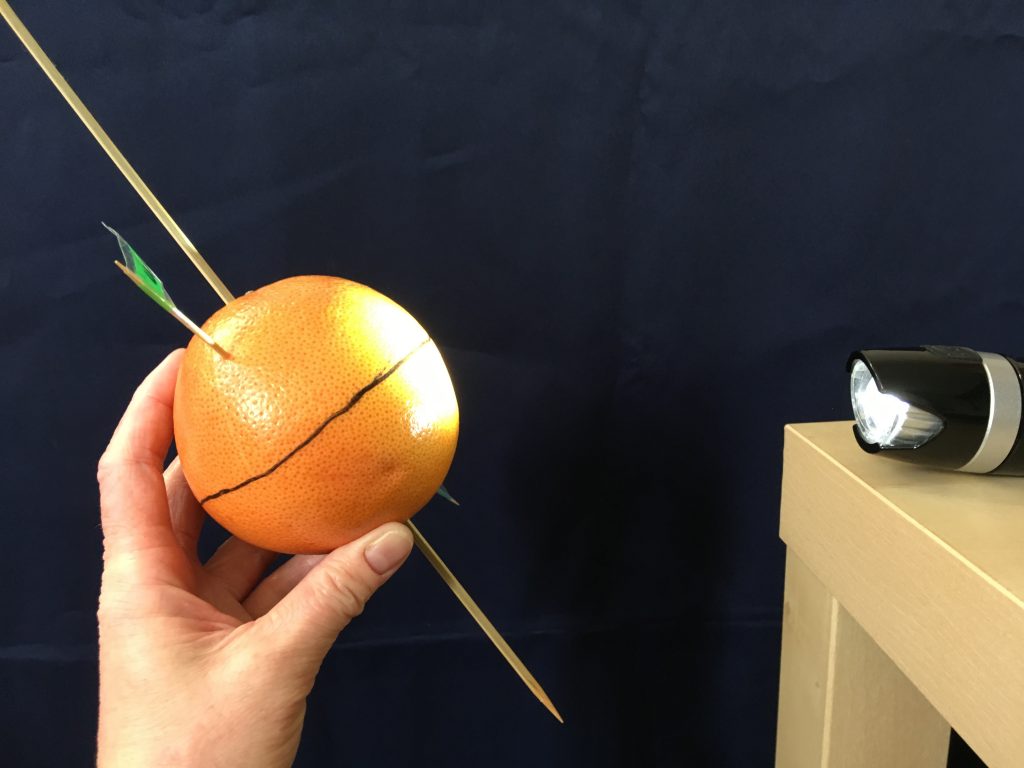
Steps 7&8: move the Earth around the Sun, keeping the North Pole pointing at the North Star 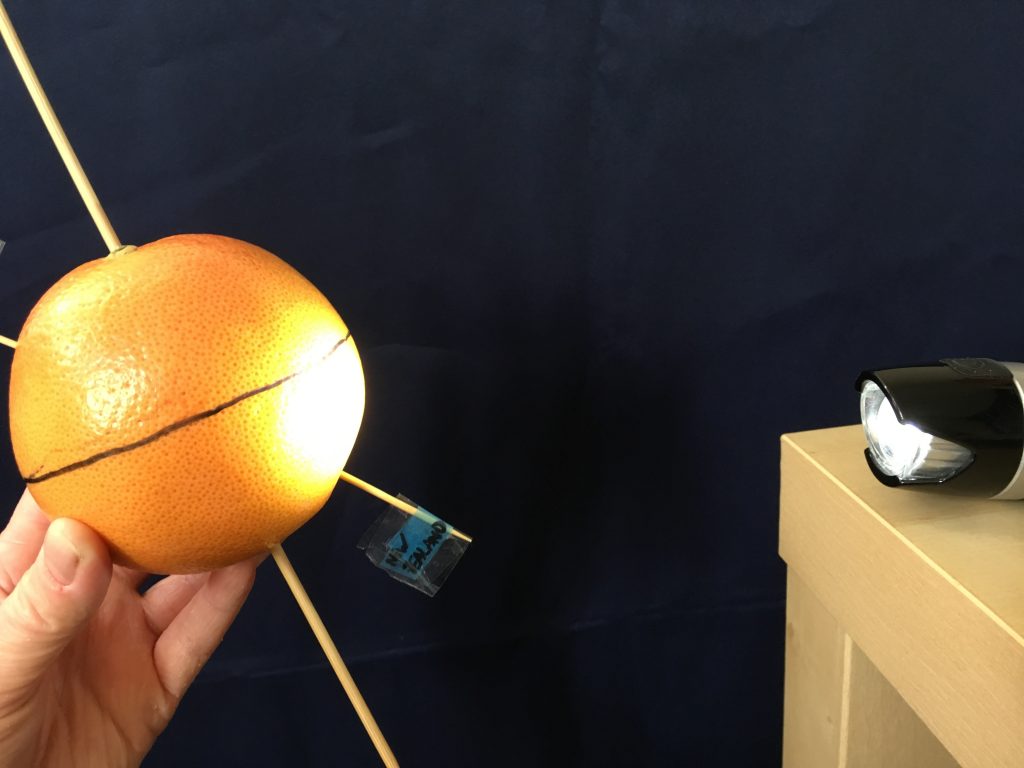
Steps 9&10: stop when you are on the opposite side of the Sun, spin the Earth so that New Zealand is in daylight and note what you see 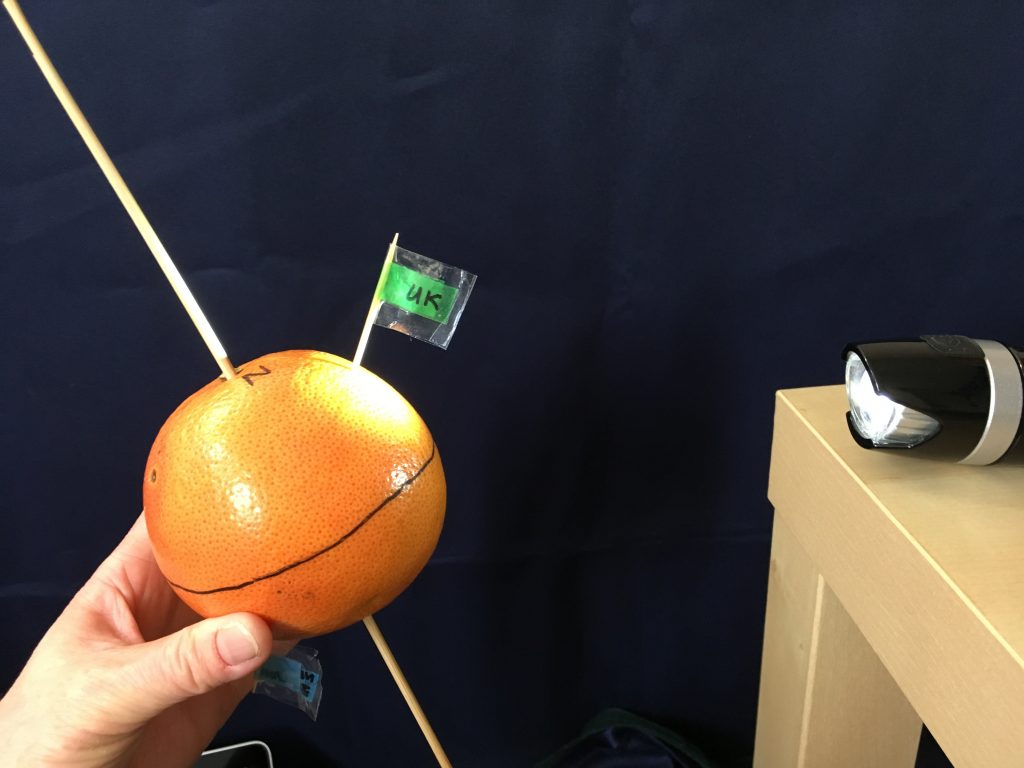
Steps 11&12: spin the Earth so that the UK is in daylight and note what you see
Extension activities:
Walking the Seasons – As each season changes, you can walk around the school site or local environment and note the changes. Students can design their own paradigms for the experiment – what are the key changes they expect to see?
Experimenting with shadows – To understand how the position of the Sun in the Sky relates to seasons, you can try a practical experiment on sunny days at different times of the year. Standing in the same place and at the same time of day, students put a large child-sized piece of paper on the ground. Each child can then draw (or draw for each other) the size and shape of their shadow on the ground. How does this change over the course of the year? How does this affect temperature, light and heat that we experience?
Climate change – You can link to the Climate Emergency and discuss how seasonal changes are becoming less predictable. What impact will this have on our Earth? This could also include a discussion of the difference between climate (long-term and large-scale trends) and weather (day-to-day, localised conditions).
Geographical Research – Students could use an atlas or the internet to look up interesting places around the world and find out what season it is there in different months of the year. This can incorporate more geography, as well as aspects of living things and their habitats, discussing what you might see in the way of plants and animals in different countries at different times of year. This research could be used as the basis of a classroom display – students could illustrate different seasons in different countries based on what they have learnt, and the drawing could be used to decorate a display showing how the Earth orbits the Sun. This could again link to climate change and how the seasonal variations we are experiencing impact on different regions of the Earth – for example the rainforest forests in Malaysia no longer have distinct wet and dry seasons – which are integral to their survival.
Common misconceptions:
- People often think that it is warmer in the summer because we are closer to the Sun – the Earth is actually slightly closer to the Sun during the northern winter, but this has a tiny effect on the climate. The seasons are caused entirely by the tilt of the Earth’s axis.
Use with other Years:
- Year 1 Walking the Seasons – This activity would be ideal for Year 1 children as a practical experience of observing seasonal changes throughout the school year.
Curriculum links:
- Geography KS1 human and physical geography – location of hot and cold areas of the world in relation to the equator and poles
- Geography KS1 geographical skills and fieldwork – use maps/atlases/globes to identify countries, continents and oceans, use simple compass directions
- Science KS1 Seasonal changes – observe changes across the four seasons; observe and describe weather associated with the seasons and how day length varies
- Science KS2 Earth and space – movement of the Earth relative to the Sun
- Science KS2 Earth and space – use the idea of Earth’s rotation to explain day and night and the apparent movement of the Sun across the sky
- Science KS2 Living things and their habitats – describe the differences in the life cycles of a mammal, an amphibian, an insect and a bird (can be incorporated into the extension by comparing animals that might be seen on opposite sides of the world in different seasons)
Linked activities:
A more detailed discussion of seasons, including seasons on other planets:
https://www.lpi.usra.edu/education/skytellers/seasons/
Seasons Around the World, a similar activity introducing the concept of seasons from astroEDU:
https://astroedu.iau.org/en/activities/1604/seasons-around-the-world/
Linked resources:
Copyright: Megan Argo 2019